
How to Waterproof Shower Walls the Right Way
Tile can make a shower look finished, but it does not make the wall behind it waterproof. Grout is porous, small cracks can develop around corners and fixtures, and water will eventually find any weak point in the assembly. Knowing how to waterproof shower walls before tile is installed is one of the most important parts of a lasting bathroom remodel.
A properly waterproofed shower protects framing, insulation, drywall in adjacent rooms, and the floors below. It also helps prevent the hidden moisture conditions that lead to mildew odors, stained ceilings, loose tile, and costly repairs. The best method depends on the shower design and the products being used, but the goal is always the same: create a continuous waterproof layer that directs water back into the shower pan.
Start With a Sound Shower Wall Assembly
Waterproofing cannot correct a weak, damaged, or improperly prepared wall. Before installing any membrane, remove old materials down to the studs when a full shower renovation is planned. Check the framing for rot, mold, loose blocking, or bowed studs. Replace compromised lumber and make sure the walls are flat enough for tile installation.
This preparation matters especially around corners, benches, niches, and plumbing walls. Tile will follow the wall behind it. If framing is uneven, the finished shower may look wavy and leave difficult-to-seal joints around fixtures.
Use a suitable shower backer board rather than standard drywall in the wet area. Cement board, fiber-cement board, foam backer board, and certain coated gypsum products are commonly used, but each has specific installation requirements. Some boards resist water but are not waterproof on their own. Read the manufacturer instructions for approved fasteners, seam treatment, and compatible waterproofing materials.
A well-built shower also needs solid blocking between studs wherever grab bars, shower doors, benches, or accessories may be installed. Adding this support before the walls are closed is simple and can prevent unnecessary wall repairs later.
Choose One Waterproofing System
There are two common approaches to shower-wall waterproofing: a moisture barrier behind the backer board or a waterproof membrane applied on the face of the backer board.
A behind-the-board barrier typically uses plastic sheeting or roofing felt installed over the studs, with the bottom edge overlapping the shower pan flange. Water that reaches the backer board can drain down the barrier and into the pan. This method can work when detailed correctly, but it does not protect the backer board itself from becoming wet.
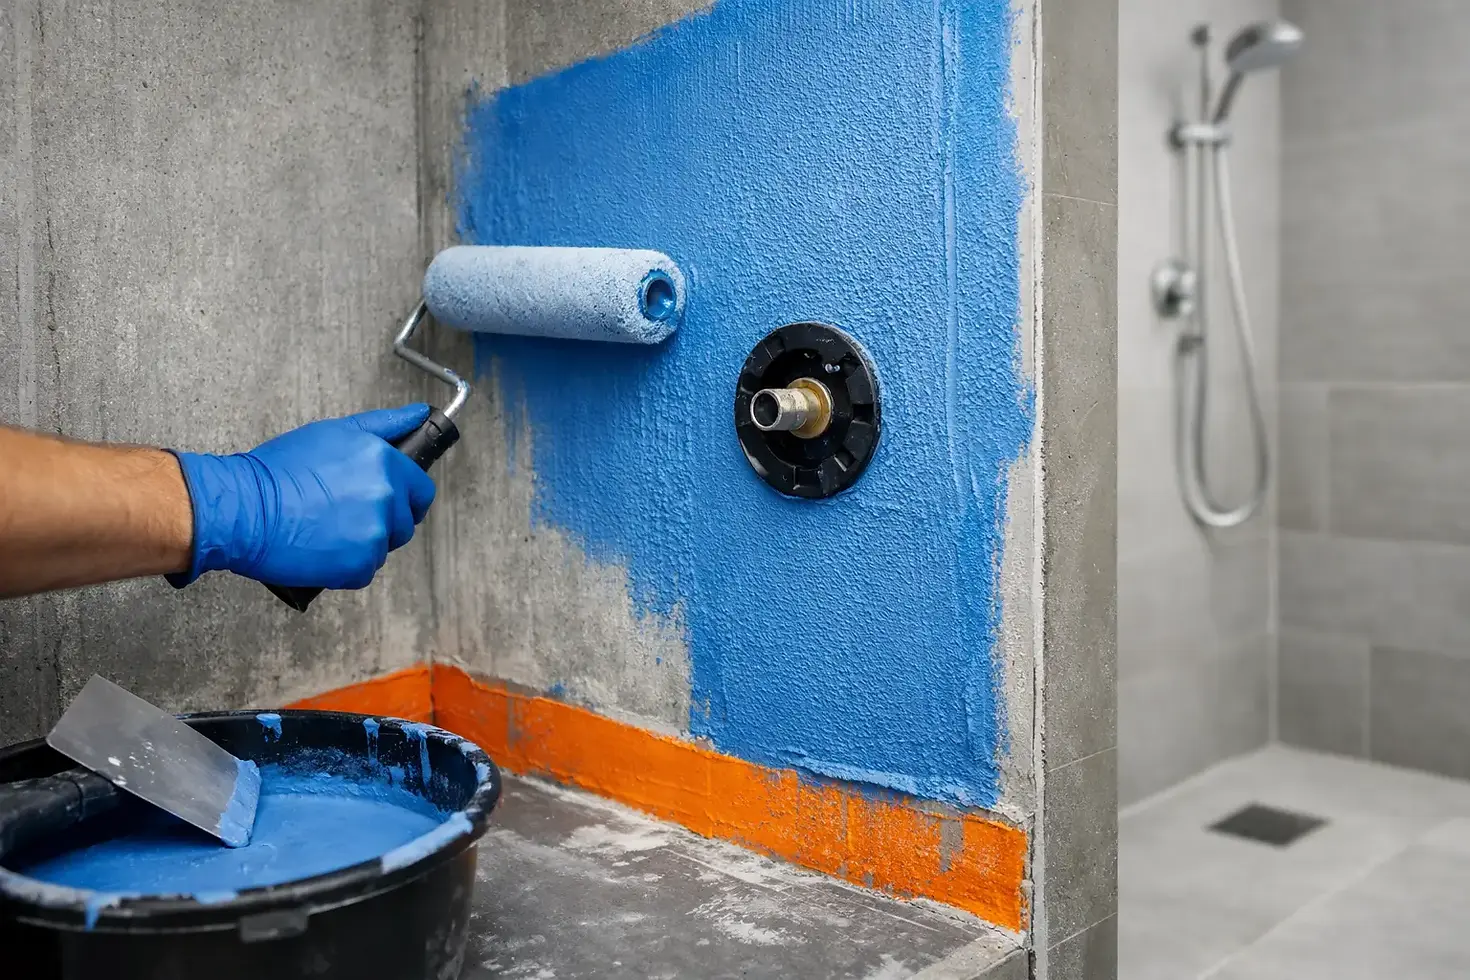
A surface-applied system places the waterproofing layer directly behind the tile. It may be a liquid membrane rolled or brushed on, a sheet membrane bonded with mortar, or a purpose-built foam panel system with sealed seams. Surface waterproofing is often preferred for custom showers because it keeps water closer to the surface, protects the wallboard, and makes niches and benches easier to waterproof correctly.
Do not casually combine a behind-the-board moisture barrier with a surface waterproofing membrane. In some wall assemblies, two low-permeance layers can trap moisture between them. Follow one complete, manufacturer-approved system, particularly in steam showers or bathrooms with high humidity.
How to Waterproof Shower Walls Step by Step
The details at seams, corners, and transitions are more important than broad open wall areas. A careful installation follows a clear sequence.
1. Install the Backer Board Correctly
Cut and fasten the selected backer board according to its instructions. Leave the required gaps between panels and at changes of plane, such as wall-to-wall corners and wall-to-floor transitions. Do not drive screws so deeply that they break the board surface.
Keep the board positioned properly above or in relation to the shower pan flange as directed by the pan and board manufacturers. This is a common place for errors. If water can run behind the pan flange instead of into the pan, even a carefully tiled shower can leak.
2. Treat Seams and Fasteners
For liquid-applied systems, seams are commonly reinforced with approved mesh tape embedded in waterproofing material. Sheet systems use overlapping membrane sections or sealed bands at seams. Fastener heads must also be covered when the product instructions require it.
Avoid assuming that ordinary joint compound, drywall tape, or leftover construction adhesive will work in a shower. Waterproofing products are designed to work together, and substituting materials can affect adhesion and warranty coverage.
3. Seal Corners, Changes of Plane, and Plumbing Openings
Corners move slightly as a house settles and materials expand or contract. These transitions need flexible, reinforced waterproofing details rather than a simple coating alone. Use preformed corner pieces or reinforcing fabric where required by the membrane system.
Pay close attention to the mixing valve, shower arm, body sprays, and any handheld-shower mounting locations. Use manufacturer-approved pipe seals, gaskets, or carefully applied membrane around every penetration. These small openings are frequent sources of slow leaks behind shower walls.
4. Waterproof Niches and Benches With Extra Care
A recessed niche is convenient, but it introduces multiple inside corners and horizontal surfaces where water can collect. Use a preformed waterproof niche or construct one with a complete membrane system. The bottom of the niche should slope slightly toward the shower so water does not sit against the back wall.
Built-in benches require the same attention. Every horizontal surface should have a slight slope toward the drain, including the top of the bench, curbs, and ledges. Flat surfaces may look level, but they often hold water and shorten the life of grout and caulk.
5. Apply the Membrane to the Required Thickness
Liquid membranes are not paint. They must be applied at the manufacturer’s specified wet and dry film thickness, usually in multiple coats. Applying a coat too thin can leave pinholes or create a membrane that is not truly waterproof.
Use the recommended roller, brush, trowel, or notched applicator. Allow each coat to dry for the stated time before adding the next one. A color change may indicate drying, but temperature, humidity, and airflow can all affect cure time.
With sheet membranes, use the recommended mortar and trowel size. Press the membrane firmly into place and remove air pockets. Overlap seams by the required amount or use approved seam tape. The finished surface should be continuous, with no exposed board at edges, corners, or fixture penetrations.
6. Connect the Walls to the Shower Pan
Shower walls and the shower pan must operate as one water-management system. Whether the project uses a prefabricated acrylic base, a mortar bed, or a bonded waterproof pan system, the wall membrane needs to tie into the pan correctly.
The exact connection varies by product. Some systems use a bonding flange at the drain and membrane that runs continuously from walls to floor. Others rely on a pan flange behind the wall board. This is not a place to improvise. Match the wall waterproofing method to the pan design before installation begins.
Let the Waterproofing Cure Before Tile
Rushing to set tile can compromise the waterproofing layer. Allow the membrane to dry or cure fully based on the manufacturer’s instructions. In a custom tiled shower, a flood test may be appropriate before tile installation, particularly when the pan is newly built or the project includes complex waterproofing details.
A flood test generally involves temporarily plugging the drain, filling the shower base to a safe marked level, and watching for a drop in water level or signs of leakage below. Local code requirements and the shower system being used should guide this process. Walls are not usually flood-tested on their own, but confirming the pan-to-wall connection before tile is installed offers valuable peace of mind.
Tile, Grout, and Caulk Are the Finish Layer
Once waterproofing is complete, use an appropriate thinset mortar and install tile with full, even support. Large-format tile, natural stone, and heavy wall tile may require specific mortars and installation methods. Proper tile coverage matters because voids behind tile can allow cracks under impact or movement.
Grout should be sealed when the product requires it, but sealer is not a substitute for waterproofing. At corners and changes of plane, use a flexible, mildew-resistant sealant rather than grout. Grout is rigid and can crack where two surfaces move independently.
After the shower is in use, keep an eye on failing caulk, cracked grout, loose tile, or persistent moisture outside the shower. Addressing those signs early is far less expensive than repairing damaged framing.
A shower remodel is a major investment, and the work behind the tile deserves the same care as the finish you see every day. If you are planning a bathroom update in Tennessee, Georgia, or Alabama, Tri-South Construction can help you evaluate the right waterproofing approach before hidden problems become expensive repairs.


Comments